How to use lighting to highlight architectural features begins with careful observation, not brighter fixtures. Notice how daylight touches a stone arch, grazes a timber ceiling, or disappears into a deep window reveal. Then choose light that clarifies those forms without flattening their texture. A narrow beam can reveal a column’s edge; concealed linear lighting can trace a stair or ceiling plane. The aim is emphasis, not spectacle.
The U.S. Department of Energy reports that residential LEDs use at least 75% less energy than incandescent lighting and can last up to 25 times longer. That makes efficient, well-placed accent lighting a practical design choice, though energy savings depend on the installation and use. Architectural lighting pioneer Richard Kelly wrote, “Light is the giver of all presences, and material is spent light.” His idea remains useful: light helps people read shape, depth, and material. Still, a beautifully lit wall can feel cold if glare reaches the seating area.
A thoughtful scheme layers ambient, task, and accent light, then tests each layer at night. Start with the feature: a textured wall, a vaulted ceiling, or a carefully detailed doorway. Use adjustable fixtures where possible, and check beam spread, mounting angle, color temperature, and dimming performance. Small changes matter. One beam may be enough. Yet real rooms rarely behave like renderings; finishes reflect light unpredictably, and shadows can obscure details. This guide explores how to use lighting to highlight architectural features while balancing visual comfort, material character, and energy use.
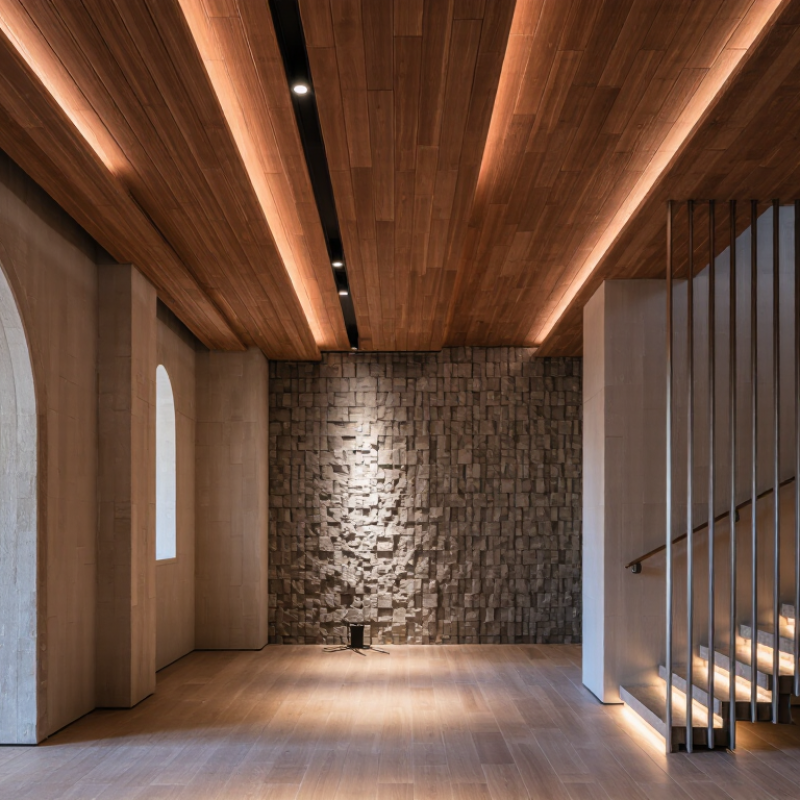
Architectural lighting works best when it reveals form, not merely brightness. A narrow beam grazing a stone wall can expose its texture, while concealed linear light can make a ceiling appear weightless. The viewer reads these differences through contrast, shadow, and surface reflection. The Illuminating Engineering Society recommends evaluating luminance, glare, and visual comfort rather than relying only on illuminance levels. This matters in practice. A bright fixture aimed directly at a column may flatten its shape and create harsh reflections on polished flooring. Soft side lighting usually describes depth more convincingly. Sometimes, less light communicates more.
Energy also shapes responsible design decisions. The International Energy Agency reports that buildings consume about 30% of global final energy. The 2023 Global Status Report for Buildings and Construction attributes roughly 32% of global energy use and 34% of energy-related carbon emissions to buildings and construction. These figures encourage designers to illuminate selected features instead of washing every surface equally. Occupancy controls, daylight sensors, and carefully aimed optics can reduce unnecessary operating hours. Yet calculations are not enough. I have seen a beautifully modeled façade lose its character because nearby trees created unexpected shadows. On-site testing remains essential. Walk through the space at night, view the structure from different angles, and adjust the light after observing real surfaces. The first lighting scheme is rarely perfect.
| Architectural Feature | Lighting Approach | Typical Fixture | Placement | Useful Starting Point | What the Light Reveals |
|---|---|---|---|---|---|
| Textured stone or brick wall | Grazing light from a shallow angle | Linear wall-grazer or adjustable spotlight | Near the wall, aimed along its surface | Warm-to-neutral white; test spacing and angle on site | Surface relief, joints, and material variation through highlights and shadows |
| Columns and pilasters | Vertical accent lighting | Narrow-beam adjustable downlight or compact uplight | At the base or above, directed along the vertical form | Choose beam spread to suit column width and height | Height, rhythm, and transitions between light and shade |
| Coffers, beams, and ceiling details | Concealed cove or indirect lighting | Recessed linear LED luminaire | Within a cove or behind a beam edge, aimed at the ceiling | Use a dimmable, shielded source to limit glare and visible hotspots | Ceiling depth, geometry, and the outline of structural elements |
| Arches and niches | Focused accent lighting with controlled spill | Small adjustable spotlight or recessed niche light | Above or within the recess, aimed at the curved or recessed surface | Aim carefully to avoid glare and uneven brightness | Curvature, depth, and the boundary between the opening and surrounding wall |
| Stair treads and handrails | Low-level guidance and edge lighting | Shielded step light or concealed linear fixture | In the riser, adjacent wall, or beneath a handrail | Provide consistent visibility while keeping the light source out of direct view | Tread edges, stair form, and safe changes in level |
| Decorative molding and cornices | Soft directional wash | Concealed linear light or adjustable wall washer | Above or below the molding, depending on its profile | Mock up the light position to reveal detail without harsh shadows | Profile, edges, and decorative relief |
| Facade, entrance, or exterior columns | Shielded facade wash or selective uplighting | Outdoor-rated wall washer or adjustable ground fixture | Positioned to illuminate the intended surface while limiting spill | Use weather-appropriate equipment and control glare into neighboring areas | Building form, entrance hierarchy, and exterior material texture |
Planning note: Treat the values and placements as starting points, not fixed specifications. Review samples on site, account for surface reflectance and viewing angles, and use appropriate shielding, dimming, and local electrical-code requirements.
Lighting should reveal the surface, not simply brighten the room. Textured stone benefits from close grazing light. Smooth plaster suits an even wall wash.
Narrow beams sharpen columns, sculptures, and deep window reveals. Medium beams suit entrances and repeated wall features. Wide beams create softer façade washes.
Recessed linear lighting can follow coves and ceiling edges. It adds a lighter visual line. Keep the brightness controlled, or the ceiling may look uneven.
Concealed uplighting often follows an arch naturally. Test it after dark. Daylight may hide uneven brightness.
Warm light can enrich wood, brick, and brass. Neutral light often preserves pale stone and painted surfaces. Check samples on site before deciding.
Aim beams away from eye level whenever possible. Use shielding near walkways and seated viewing positions. A polished floor can reflect an unexpectedly harsh source.
Study ceiling height, surface texture, viewing distance, and maintenance access. Mark shadows and viewing positions on an elevation drawing. Temporary fixtures can prevent expensive rewiring.
Ambient lighting supports movement. Accent lighting highlights columns, artwork, or textured walls. Task lighting supports reading or cooking. Dimmers help adjust the space after dark.
Not always. A slightly uneven wash may feel more natural. A dramatic shadow can look impressive in a rendering but become distracting daily. Real spaces need honest testing.
How to use lighting to highlight architectural features begins with understanding how light reveals form, texture, depth, and proportion. By observing the building’s structure, you can identify which elements deserve attention, such as columns, arches, staircases, textured walls, ceilings, or decorative details. Different techniques create different effects: grazing light emphasizes surface texture, wall washing creates an even glow, and accent lighting draws attention to a specific feature.
Effective results also depend on selecting suitable fixtures, light sources, and beam angles. Narrow beams can create focused highlights, while wider beams provide softer, more balanced coverage. Careful planning of placement and direction helps reduce glare and unwanted shadows, while layered lighting combines ambient, task, and accent illumination. Finally, adjusting brightness, color temperature, and contrast allows you to control mood and visual hierarchy, ensuring that architectural features stand out naturally without making the space feel harsh or unbalanced.

 Bright Light Bulb