How to combine pendant lights and chandeliers effectively begins with understanding what each fixture does. A chandelier can anchor a dining room or living area, while pendants often provide focused light over an island, table, or reading nook. Used together, they add depth and help define separate zones. Used without a plan, they can compete for attention. It happens.
Start by considering the room’s size, ceiling height, and natural light. A large chandelier may overwhelm a compact space, while tiny pendants can disappear above a broad kitchen island. Choose fixtures with a shared detail, such as a finish, shape, or material, rather than matching every piece. For example, a warm brass chandelier can sit comfortably with simple brass pendants, even when their silhouettes differ.
Placement matters just as much as style. Keep the chandelier centered over its main area, then position pendants where people need task lighting. Check sightlines from doorways and seats, and leave enough clearance for people to move safely. Dimmers can help the fixtures work together at different times of day. Use bulbs with compatible color temperatures so the room does not feel split between warm and cool light.
There is no single formula. A combination that looks balanced in a showroom may feel crowded at home, especially under a low ceiling. Treat scale and spacing as starting points, then review the layout from several angles before installation. A little restraint usually helps. The goal is a layered room that feels useful, cohesive, and genuinely comfortable.
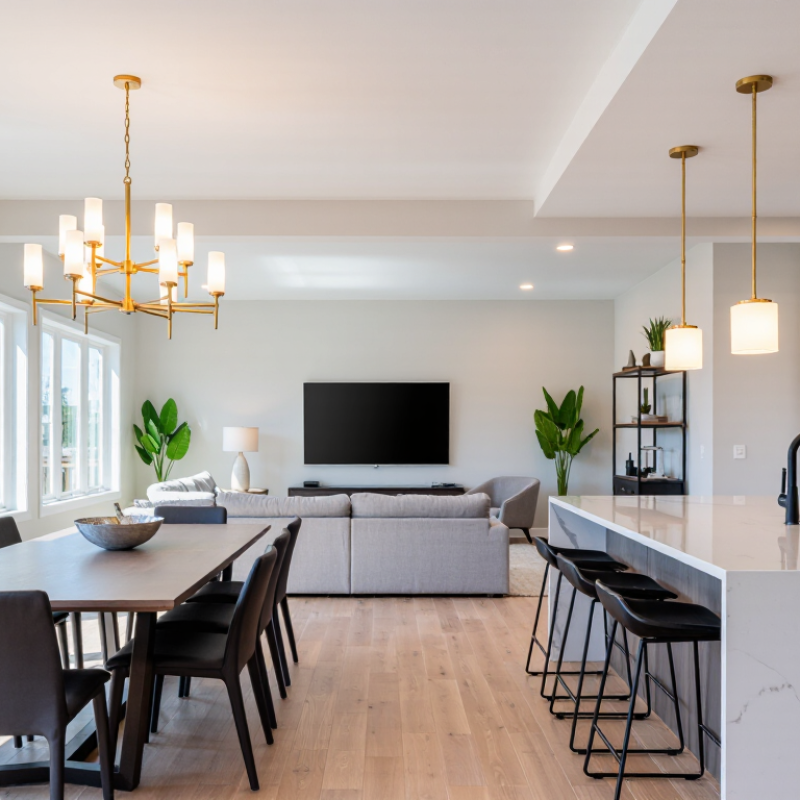
Pendant lights and chandeliers serve different visual and practical roles. A chandelier usually acts as a central feature, spreading light across a dining table or anchoring an entryway. Pendants are more focused. Hung above a kitchen island, one can brighten a chopping area while keeping light close to the task. Think of the chandelier as the room’s broad gesture, and pendants as precise accents. Small but useful. Their shades and hanging heights matter: a low pendant can create glare, while a chandelier that is too small may feel lost above a long table.
The U.S. Department of Energy’s LED Basics guidance reports that LEDs use at least 75% less energy and can last up to 25 times longer than incandescent lighting. That makes efficient, dimmable lamps a practical choice when combining several fixtures, though placement still determines comfort. Keep the chandelier’s light soft enough for faces, then use pendants to add brighter pools where work happens. Separate controls help each layer adapt to dinner, cleanup, or quiet evenings. There is no magic formula. In a real room, ceiling height, shade material, and reflected light can upset a neat plan; test the arrangement at night before settling on final hanging heights.
Room size sets the visual balance between a chandelier and pendant lights. In a compact dining area, a broad chandelier can crowd the table, while two small pendants may feel scattered. Measure the table and room before choosing fixtures. As a rough guide, a chandelier’s width can be about half to two-thirds of the table’s width. In larger rooms, repeat pendants with even spacing so they feel connected, not like separate islands. Keep the overall arrangement calm.
Ceiling height affects both comfort and proportion. Over a dining table, the chandelier often hangs about 30 to 36 inches above the surface, but taller ceilings may call for a little more space. For walkways, leave roughly seven feet of clearance beneath hanging fixtures. Check the actual fixture dimensions; a long pendant can look elegant in a showroom and awkward at home. I have to remind myself of that. A quick paper template held at the planned height can reveal problems before installation.
Lighting needs matter as much as appearance. Let the chandelier provide general light, then use pendants to brighten a kitchen island, reading corner, or other work area. Check each fixture’s light output and beam direction, since a bright bulb can still leave a countertop in shadow. Separate dimmers make the layers easier to adjust for cooking or a quiet dinner. Not every room needs both fixture types. If the ceiling feels busy, one well-placed light may work better.
When a chandelier and pendant lights share a room, treat them as a family, not matching twins. Choose one visual thread: a repeated metal finish, a similar shade shape, or a consistent level of ornament. A brass chandelier with clear glass arms can pair well with slim brass pendants and transparent shades above an island. The shared finish links the fixtures, while their different silhouettes keep the room from feeling staged. Small differences matter.
Compare proportions and materials in daylight and after dark. A large sculptural chandelier may need quiet pendants, such as simple opal-glass globes, so the ceiling does not feel crowded. If the chandelier has woven details, echo its warmth through wood accents rather than adding another competing texture. Keep bulb color consistent; otherwise, one fixture may look warm while the other appears blue. Test samples if possible.
Finish coordination does not mean every surface must match. Brushed nickel and aged brass can work together when one clearly leads and the other appears in smaller amounts. Mixed finishes may feel less intentional when scattered evenly throughout the room. View the lights from the doorway and the main seating area. Even careful pairings can feel slightly wrong in the actual room. Adjust spacing, shade scale, or the dominant finish before replacing a fixture.
A common sizing guideline is to choose a chandelier with a diameter about one-half to two-thirds of the dining table’s width. Use this range as a scale reference when coordinating a chandelier with pendant lights.
Coordination tip: Repeat a finish or material across the fixtures, then vary their shapes or sizes for contrast. Treat the chart as a guideline for the main chandelier—not as a separate size allowance for every pendant.
Treat the chandelier and pendants as separate layers, not competing focal points. Center the chandelier over the dining table or main seating area, then place pendants above the island or a nearby work surface. Keep their silhouettes out of direct sightlines between rooms. A quick floor-plan sketch helps reveal awkward overlaps before installation.
Use common dimensions as starting points, not rigid rules. Hang pendants about 30–36 inches above an island, and space multiple fixtures roughly 24–30 inches apart. Leave about 6 inches between the outer pendant and the counter edge. For a dining chandelier, aim for 30–36 inches above the tabletop. Ceiling height and fixture size may call for adjustments. Keep breathing room. If a chandelier feels heavy beside several pendants, reduce its diameter or choose simpler shades.
Proportion matters as much as placement. One practical estimate for chandelier diameter is the room’s length plus width, converted from feet to inches. In a 12-by-14-foot room, that suggests about 26 inches. Then check the fixture against the table, not just the room. It is easy to make the math work and still crowd the space. Dimmers can soften the combined glow; the U.S. Department of Energy’s Energy Saver guidance notes that LEDs use up to 90% less energy than incandescent bulbs. Choose compatible dimmable lamps, and test the light at night before settling on final brightness.
| Room or Zone | Suggested Combination | Placement and Spacing | Proportion and Clearance |
|---|---|---|---|
| Kitchen island with nearby dining area | Use a row of pendants over the island and a chandelier centered over the dining table. Coordinate the finishes or shapes without making the fixtures identical. | Center each fixture group over its own surface. For multiple island pendants, space them evenly; keep the outer fixtures roughly 6–12 inches in from the island ends. | Hang pendants about 30–36 inches above the countertop. Choose pendants that leave clear sightlines across the kitchen. |
| Dining room | Make the chandelier the main focal point. Add pendants only over a separate serving counter or adjacent island, rather than crowding the same table. | Center the chandelier over the dining table. Keep the pendant group aligned with the center of its own work surface. | A chandelier is commonly about 1/2–2/3 the width of the table. Hang it about 30–36 inches above the tabletop for an 8-foot ceiling; taller ceilings may call for a higher position. |
| Open-plan living and dining area | Use a chandelier to define the dining zone and pendants over a kitchen island or breakfast bar. Repeat one or two design details, such as finish or material, to create cohesion. | Align each fixture with the center of its zone, not necessarily with the room as a whole. Leave visual breathing room between fixture groups. | Choose fixture sizes in proportion to their individual zones. Avoid placing fixtures so low that they interrupt views between the areas. |
| Kitchen island | Use two or three pendants for a longer island, or one larger pendant where a single fixture provides suitable coverage. A chandelier is generally better suited to a nearby dining zone. | For a row, distribute fixtures evenly and keep the end fixtures approximately 6–12 inches from the island ends. Leave enough space between shades to avoid a crowded appearance. | Allow about 30–36 inches from the countertop to the bottom of the fixture. Check that the fixtures do not obstruct the view across the island. |
| Entryway with an adjacent hallway | Use a chandelier in the entry and smaller pendants only where the hallway ceiling height and circulation allow. Keep the fixture styles visually related. | Center the entry chandelier in the entry space. Place any hallway fixtures along the hallway’s centerline and maintain consistent spacing. | In walkways, keep the lowest part of a fixture at least 7 feet above the floor. In a tall or open-to-below entry, check the view from both floors before choosing the drop length. |
| Bedroom with a reading nook | Use a chandelier or pendant as general lighting, with a separate pendant near a reading chair if it provides useful task light. | Center the main fixture in the room or over the bed area. Position the reading pendant beside the chair, outside the main walking path. | Keep hanging fixtures clear of head and walking zones. Select a reading pendant that directs light toward the reading area without causing glare. |
Planning note: These measurements are practical starting points, not fixed rules. Confirm the fixture’s installation instructions, ceiling height, furniture dimensions, and local electrical requirements before installation.
A chandelier and pendant lights can share a room without competing when each has its own control. Let the chandelier provide soft ambient light, then use pendants to brighten a kitchen island, dining table, or reading spot. Put them on separate dimmers so you can lower the chandelier during dinner while keeping the tabletop clear and usable. Check that the lamps and dimmers are compatible; some combinations flicker or dim unevenly. Small details matter.
The U.S. Department of Energy’s 2017 report, Energy Savings from Networked Lighting Controls in Commercial Buildings: A Follow-Up Study, analyzed 114 projects and reported average lighting-energy savings of 47%. Those commercial results are not a household guarantee, but they illustrate how control can reduce unnecessary light.
Try a few scenes: both fixtures bright for cleaning, pendants focused for food preparation, and a low chandelier with gentle pendant light for an evening meal. Keep light out of diners’ eyes, especially when shades are glass or surfaces are glossy. Test the setup after dark; daylight can make a room seem brighter than it feels at night. And be honest about the compromise: one dimmer setting rarely suits every task.
A chandelier usually provides broad light and becomes a room’s focal point. Pendants direct light toward specific areas, such as a kitchen island. One is broad; the others are precise.
Hang them above work or dining surfaces, where focused light is useful. Keep shades high enough to avoid glare while chopping or talking across the table.
Repeat one detail, such as a metal finish or shade shape. A brass chandelier can pair with slim brass pendants, even when their silhouettes differ. They need not be twins.
Not necessarily. Brushed nickel and aged brass can work together if one finish leads and the other appears in smaller amounts. Too many competing details may feel scattered.
Give the chandelier and pendants separate dimmers. Use softer chandelier light for dinner and brighter pendant light for food preparation or cleanup.
Daylight can make a room seem brighter than it feels at night. Check for glare on glass shades, shiny tables, and diners’ faces. Test it tonight.
LEDs use at least 75% less energy and can last up to 25 times longer than incandescent lamps, according to federal energy guidance. Choose dimmable lamps compatible with your controls.
View them from the doorway and the main seating area. Adjust spacing, shade size, or which finish dominates. A plan can still feel off; rethink it before replacing a fixture.
How to combine pendant lights and chandeliers effectively begins with understanding what each fixture contributes. A chandelier can create a focal point and provide broad ambient light, while pendant lights offer more targeted illumination over areas such as kitchen islands, dining tables, or reading spots. Consider the room’s dimensions, ceiling height, and everyday lighting needs before choosing fixtures, so neither feels oversized, crowded, or out of place.
For a cohesive result, coordinate styles, materials, and finishes without making every fixture identical. Plan placement and spacing around furniture and sightlines, keeping suitable proportions and enough visual breathing room. Finally, layer the lighting: combine general illumination with focused light, and use separate controls or dimmers where possible. This makes it easier to adjust brightness for different activities and create a balanced, comfortable atmosphere throughout the room.

Bright Light Bulb